4/20/2026
React Native Application Development: A Practical Playbook
React Native application development playbook for startups: pick the right setup, define architecture, build with quality gates, and ship confidently to stores.

React Native can be the fastest path from funded idea to a real iOS and Android product, but only if you run it like a product program, not a “cross-platform experiment.” The teams that ship reliably treat react native application development as a full lifecycle: product constraints, architecture, quality gates, release operations, and post-launch iteration.
This playbook is a practical, end-to-end approach you can adapt to your startup. It’s written for founders and product leads who need predictability: what decisions to make, what artifacts to produce, and what to standardize so your app ships and keeps shipping.
1) Start with constraints, not features
Before you pick libraries or argue Expo vs bare, align on constraints that will shape every engineering decision. This step prevents the two most common React Native failures: (1) building the wrong MVP and (2) building the right MVP on the wrong assumptions.
Define these inputs in a one-page “Build Brief”:
- Primary job to be done: the single thing a user must accomplish within the first session.
- Non-negotiable experience: what must feel “native premium” (for example, camera flow, gesture-heavy navigation, offline mode).
- Risk register: unknowns that could force native work (BLE, background location, audio, heavy video, complex animations).
- Success metrics: activation, retention, latency targets, crash-free sessions.
- Timeline reality: what must ship in 6 to 10 weeks vs what can wait.
If you want a crisp definition of what “end-to-end” should include across discovery, UX, engineering, and launch, it helps to align your stakeholders using a reference like Appzay’s guide on what end-to-end mobile app development services include.
2) Choose the right React Native setup (and document why)
In 2026, the “best” setup is the one that matches your constraints and your team’s operational maturity.
Expo vs bare: a decision table you can actually use
| Decision point | Expo (managed or prebuild) tends to fit when | Bare React Native tends to fit when |
|---|---|---|
| Time to first release | You need speed and sensible defaults | You can invest early in custom build tooling |
| Native customization | You can stay within common native needs or use targeted config plugins | You need deep custom native changes and frequent platform-level work |
| Team composition | Mostly JS/TS engineers, limited native bandwidth | Strong iOS/Android expertise in-house |
| Long-term ops | You want upgrades and build pipelines to be simpler | You want total control of native build systems |
Whatever you choose, write a short “Stack Rationale” and keep it in the repo. It should answer:
- Why this approach fits your top 3 constraints.
- What you are explicitly not optimizing for (for example, custom native modules in v1).
- What would trigger a migration (for example, a hard requirement for background BLE).
Treat the New Architecture as a compatibility requirement
React Native’s direction is clear: modern rendering and native interop. The practical takeaway is not “rewrite everything,” it’s avoid dependencies that block upgrades.
Use the official docs as your source of truth and sanity check library compatibility against React Native’s direction, starting with the New Architecture overview.
3) Design the product surface area before you build it
React Native teams ship faster when UX and engineering converge on a stable surface area early.
Deliverable: the “MVP Interaction Map”
This is not a full spec. It’s a compact map of:
- The 5 to 8 core screens
- Navigation structure (tabs, stacks, deep links)
- The “happy path” and 2 failure paths per critical flow (no network, permission denied)
- Loading, empty, and error states
The goal is to prevent invisible scope creep where every screen “needs just one more state.”
Deliverable: a clickable prototype that answers performance questions
In React Native, perceived performance is often shaped by transitions, loading skeletons, and touch responsiveness. Prototype the flows that will make or break trust:
- Onboarding and permissions
- Authentication and first data load
- The most complex gesture or animation
If the prototype reveals heavy motion or a highly branded UI, commit early to a design system approach (next section). Don’t wait until you have 40 screens.
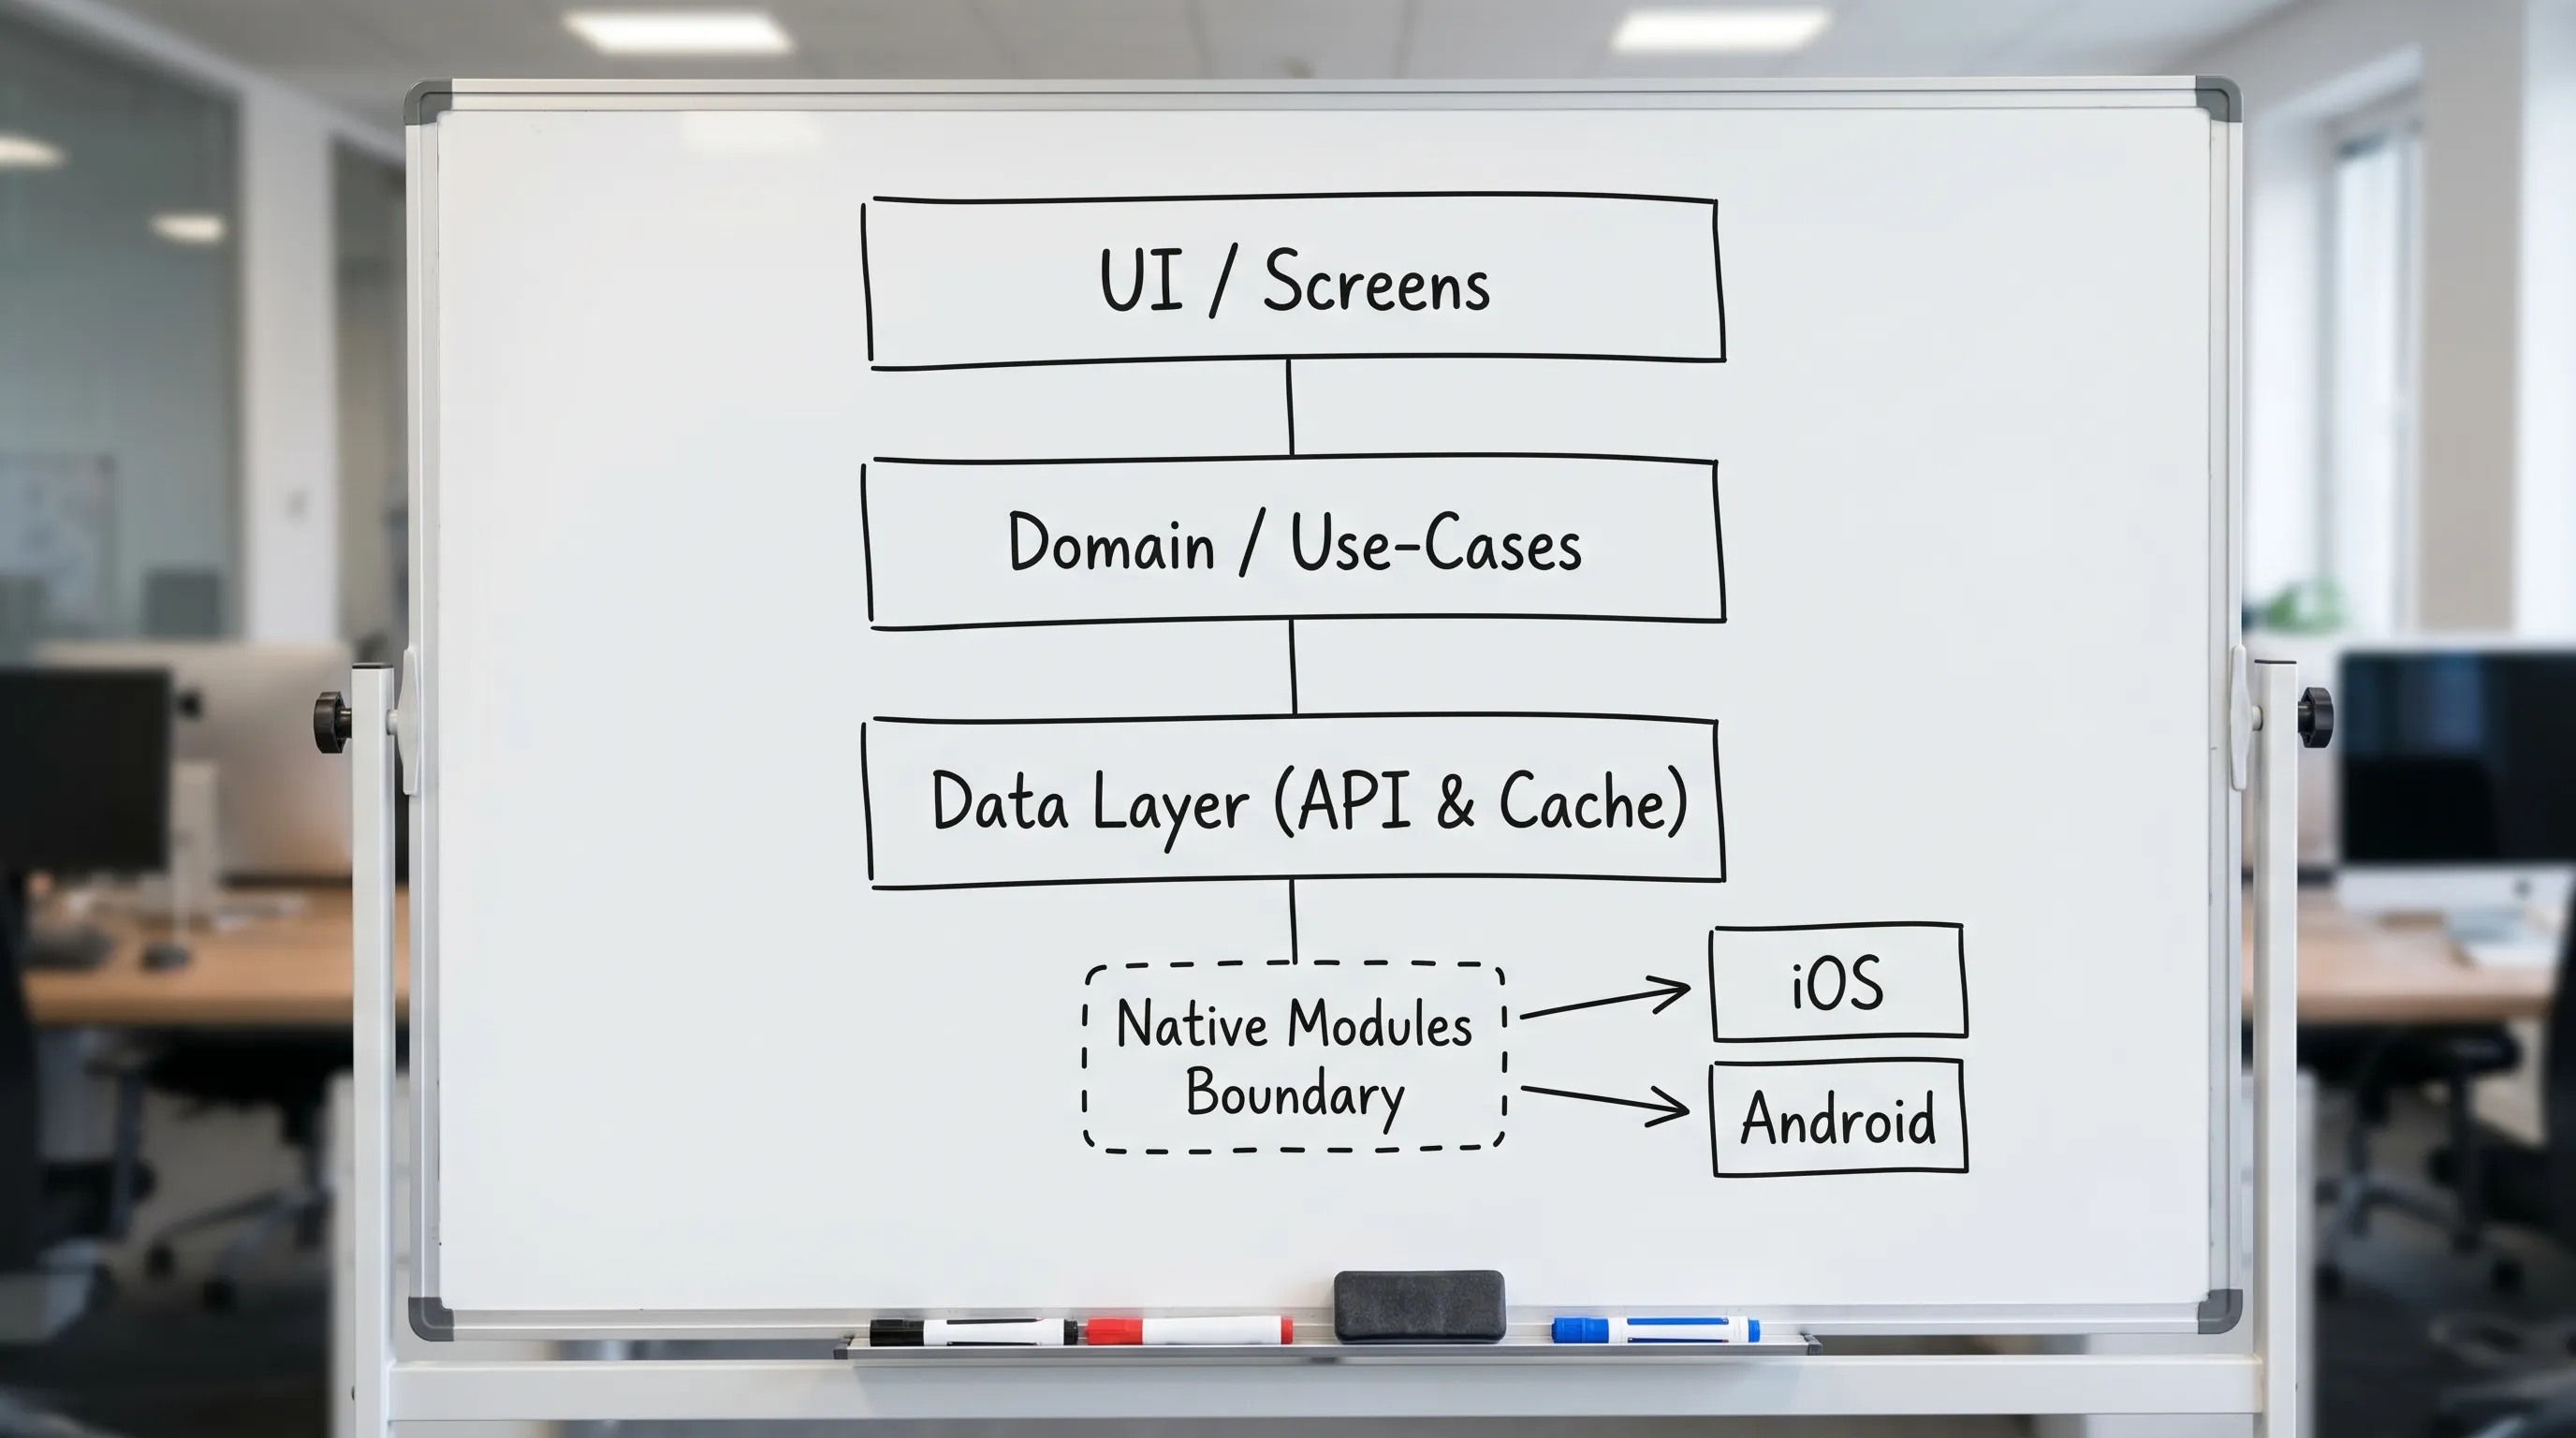
4) Establish an architecture blueprint you can scale
You do not need enterprise complexity for an MVP, but you do need clear boundaries so the app doesn’t become a tangle of components, API calls, and state.
A practical React Native architecture baseline
For funded MVPs, a maintainable baseline often includes:
- App shell: navigation, theming, environment config
- UI layer: screens and reusable components
- Domain layer: app-specific logic (use cases), data mapping
- Data layer: API clients, local cache, repositories
- Native boundary: a small, explicit surface for native modules
The win is simple: UI stays testable and replaceable, and platform-specific work stays isolated.
Decide your “state model” early
Most React Native churn comes from unclear ownership of state. Set rules up front:
- Server state: fetched, cached, invalidated (treat it differently than UI state).
- UI state: ephemeral screen concerns (filters, toggles, local form state).
- App state: auth session, entitlements, feature flags.
Write a short rule set like “No screen calls the API directly” or “All mutations go through domain functions.” This prevents one-off patterns that slow every future feature.
Create a design system that matches your runway
A design system does not have to be large. For most MVPs, you need:
- Typography scale
- Spacing tokens
- Color tokens (light/dark if required)
- 10 to 15 core components (buttons, inputs, cards, list rows, modals)
This is where React Native shines: you can keep brand consistency across iOS and Android without duplicating UI work.
5) Build with quality gates (so you don’t “QA at the end”)
The fastest teams don’t move fast because they skip quality. They move fast because quality is automated and enforced continuously.
Quality gate 1: performance budgets
Define budgets you can measure, such as:
- App launch time target on mid-tier devices
- Maximum JS thread stalls during core interactions
- Scroll performance expectations on list-heavy screens
You don’t need perfection. You need a baseline and a rule: performance regressions are treated like broken builds.
Quality gate 2: TypeScript and API contracts
TypeScript is less about developer preference and more about reducing integration rework. Make API contracts explicit (even if you are moving fast) so your app doesn’t become a runtime guessing game.
A pragmatic approach:
- Typed API client responses
- Runtime validation for critical payloads
- Centralized error mapping (so UI doesn’t invent error handling per screen)
Quality gate 3: testing pyramid that fits mobile reality
For most React Native MVPs:
- Unit tests for domain logic and data mapping
- Component tests for critical UI states
- A small number of E2E tests for the top flows (login, purchase, core action)
The mistake is trying to E2E everything. The goal is confidence on the paths that generate revenue or retention.
6) Release engineering is part of development (not a launch chore)
If your release process is manual, your velocity will collapse after the first launch. Build release operations while the product is still small.
CI/CD baseline
A practical baseline for React Native release operations includes:
- Automated builds for PRs and main
- Separate environments (dev, staging, prod)
- Signed builds with controlled access to credentials
- Automated versioning rules
- Release notes workflow
This is also where you bake in “definition of done”: a feature is not done until it is shippable.
Store readiness: plan for policy, privacy, and review
React Native doesn’t change App Store or Play Store expectations. You still need a reviewer-friendly product.
Use primary sources for rules, and keep them in your launch checklist:
- Apple’s App Review Guidelines
- Google Play’s Developer Policy Center
And if you want a concrete checklist structure that reduces rejections, reference Appzay’s App Store submission checklist.
ASO and go-to-market: don’t ship into silence
Your React Native build can be excellent and still fail if users never find it or don’t trust the listing.
For many startups, pairing strong product delivery with marketing and creative execution is what turns “a launch” into growth. If you need support on positioning, visuals, and automation-driven acquisition, partnering with an AI-powered digital marketing and design agency can help you connect your app launch to consistent lead generation and revenue motion.
7) Post-launch: instrument, stabilize, and iterate
The first week after launch is where many teams accidentally create long-term drag. Treat it as an intentional phase.
Instrumentation you should have on day 1
At minimum:
- Crash monitoring and alerting
- Performance monitoring (startup time, slow renders where possible)
- Funnel analytics for activation
- Logging that can diagnose real user issues (without collecting unnecessary personal data)
The “stabilization sprint” pattern
Plan a short sprint immediately after launch focused on:
- Fixing the top crashers
- Addressing the highest-friction onboarding and core flow drop-offs
- Improving perceived performance in the most-used screens
This prevents a common trap: adding features while the foundation is still moving.
8) Common failure modes in React Native application development (and how to avoid them)
Failure mode: you picked React Native for speed, but built like a prototype
Symptoms: inconsistent patterns, screens calling APIs directly, no release discipline.
Avoid it by defining boundaries, a minimal architecture, and CI/CD from the start.
Failure mode: dependency sprawl and upgrade paralysis
Symptoms: upgrades become multi-week projects, key libraries are unmaintained.
Avoid it by:
- Keeping a dependency policy (why it exists, who owns upgrades)
- Prefering libraries that keep pace with React Native’s roadmap
- Scheduling “upgrade budget” regularly
Failure mode: death by native edge cases
Symptoms: a small “native feature” multiplies into custom build steps and platform-specific bugs.
Avoid it by making native requirements explicit in discovery and keeping a narrow native boundary.
Failure mode: launch is blocked by compliance
Symptoms: permission copy is wrong, privacy disclosures are incomplete, reviewer notes are missing.
Avoid it by treating store and policy requirements as first-class deliverables, not end-game paperwork.
A lightweight React Native delivery checklist (copy this into your project)
Use this as a weekly audit to keep delivery on track.
| Area | What “good” looks like by MVP time | Owner |
|---|---|---|
| Product scope | Core job, MVP Interaction Map, explicit non-goals | Product |
| UX system | Tokens + core components, consistent states | Design + Eng |
| Architecture | Clear domain/data separation, native boundary defined | Engineering |
| Quality | TS baseline, tests for critical flows, performance budgets | Engineering |
| Release ops | Automated builds, environment config, signing handled | Engineering |
| Store readiness | Privacy and permissions drafted, metadata plan | Product + Eng |
| Post-launch | Monitoring live, stabilization sprint scheduled | Product + Eng |
Frequently Asked Questions
Is React Native a good choice for a funded startup MVP? Yes, if your MVP doesn’t rely on complex, deeply platform-specific features and you commit to basic architecture and release discipline. It’s best when speed and shared product logic matter, and when you can keep a small native boundary.
Should we use Expo or bare React Native? Choose Expo when speed, simplicity, and team focus matter most, and choose bare React Native when you expect heavy native customization and have strong iOS/Android capacity. Document the decision and what would trigger a change.
How do we prevent performance issues in a React Native app? Set performance budgets early, measure core interactions on real mid-tier devices, and treat regressions like broken builds. Most teams improve outcomes by optimizing the biggest screens and lists rather than “micro-optimizing” everything.
What’s the minimum testing strategy that still works? Unit tests for domain and data mapping, component tests for critical UI states, and a small set of E2E tests for your highest-value flows. The goal is confidence, not 100 percent coverage.
What usually delays launch the most? Manual release processes and store compliance work done at the last minute, especially privacy disclosures, permission copy, and reviewer notes. Bake these into your sprints from the start.
Build a React Native MVP that’s actually shippable
If you’re turning a funded concept into a premium iOS and Android app, the biggest leverage is a team that can own the full path from product decisions to App Store launch, including architecture, CI/CD, and post-launch support.
Appzay partners with founders end-to-end to design, build, and ship high-quality mobile apps, often acting as a technical co-founder for execution and delivery. If you want a React Native plan tailored to your constraints, you can start a conversation at Appzay.